Developing the Idea
Inspiration
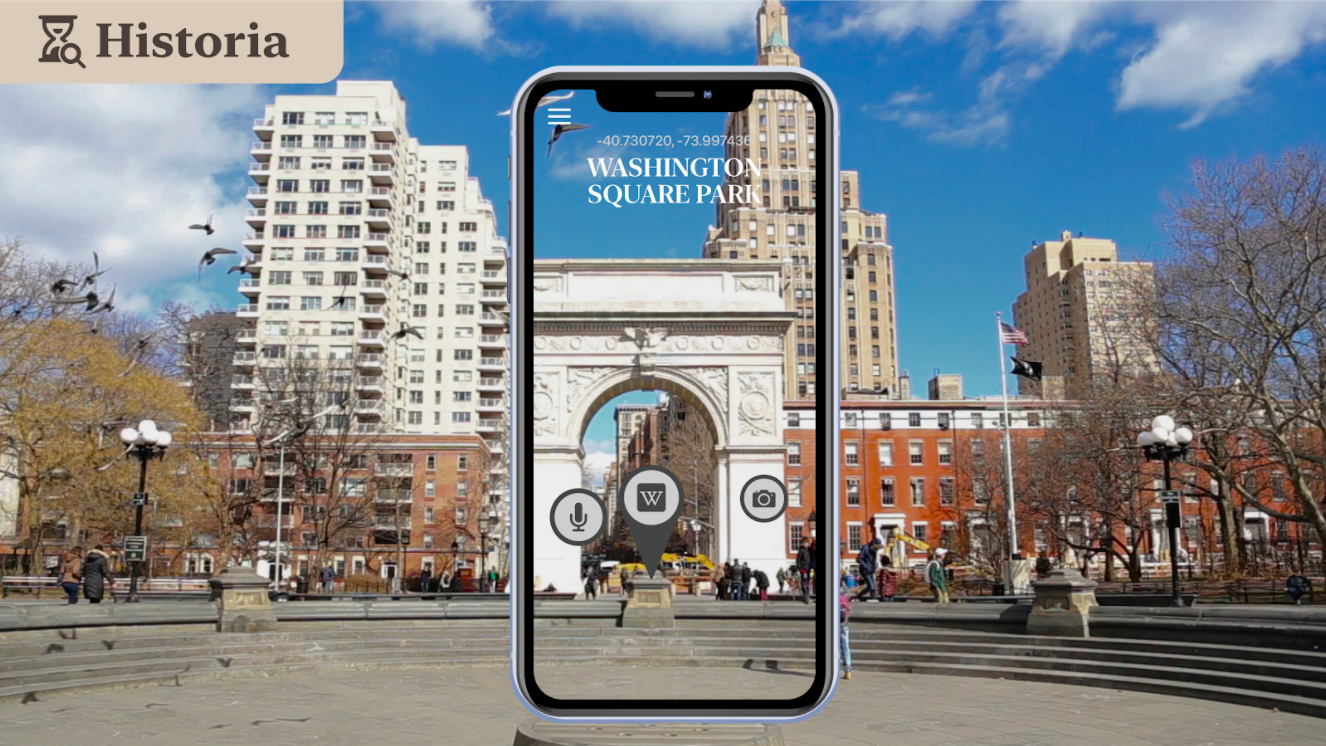
In the past couple of years I've become keenly interested in documenting the ever-changing cityscape of New York. Last semester I worked on a VR-based experience that used the immersive nature of virtual reality to create a three-scene historical experience centered on the changing streetscape witnessed by a single street corner by Washington Square Park over the course of four hundred years. Now that I've learned how to develop augmented reality experiences in this semester's New Realities class, I wanted to see what sort of historical experience can be created using the unique attributes of augmented reality.
Initial Proposal
The first step of this project was the proposal phase– putting together a mockup of the app interface and functionality that we could use to get initial feedback on the basic idea of the project from our peers and professors. I initially went in quite a different direction than what the end result ended up being– showing an interface of 2D circles floating above the ground, lat/long at the top, and not much else.
I got quite a lot of feedback from this first glimpse into the app. First was that the user needed the ability to find their way around the area, being directed to new markers in an area that they might not be familiar (a lot of the users of this app would probably be tourists). The other and primary thrust of the critique was that the 2D interface felt tacked on, like a separate layer that doesn't make interesting use of the 3D environment it lives in. As soon as class ended, I started development of a new design and diegetic user interface that integrated itself into the streetscape.
Research and UX
Identifying Target Audience
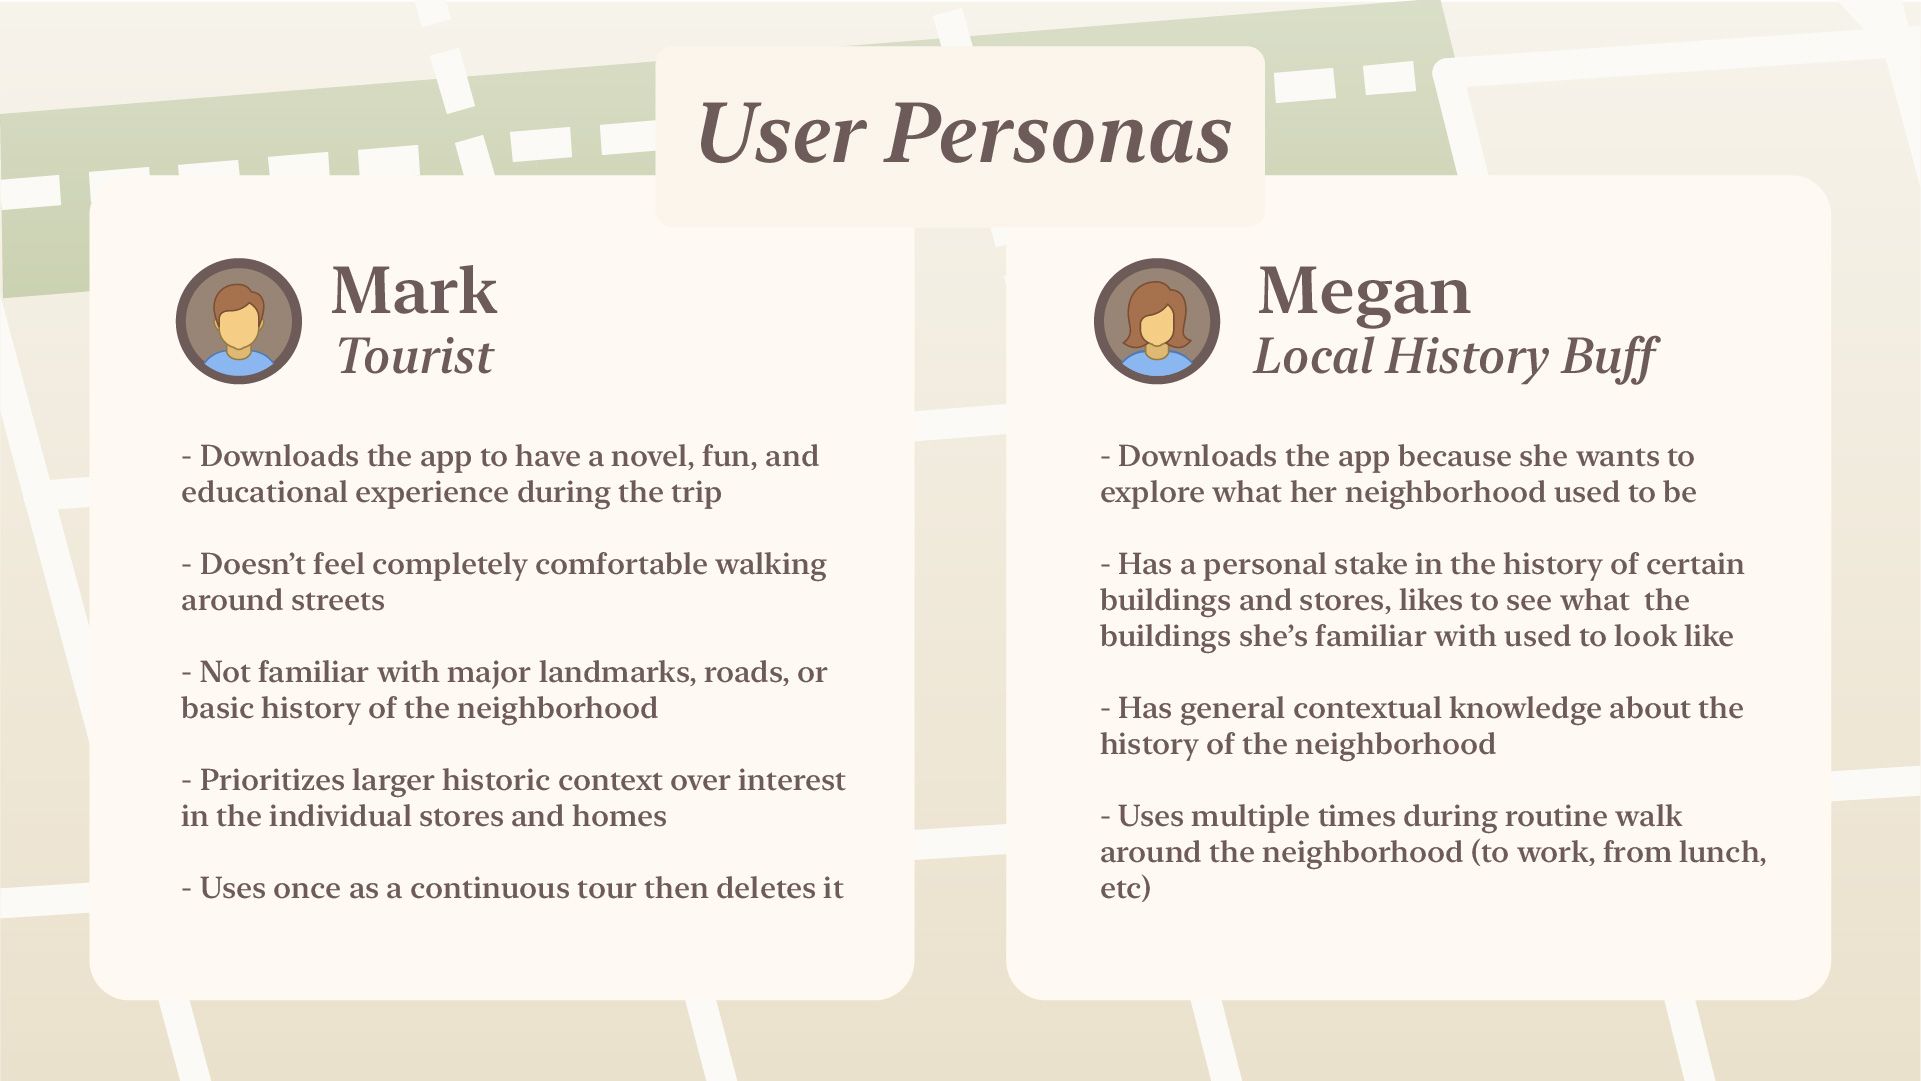
The first part of the design process for this app was identifying the target audiences I needed to design for– who did I think would be using an augmented reality historical app. I arrived at the conclusion that there would be two primary camps of users: out of town tourists and local historical buffs. I created a couple user personas to more thoroughly explore each user group's needs:
Generating User Flow
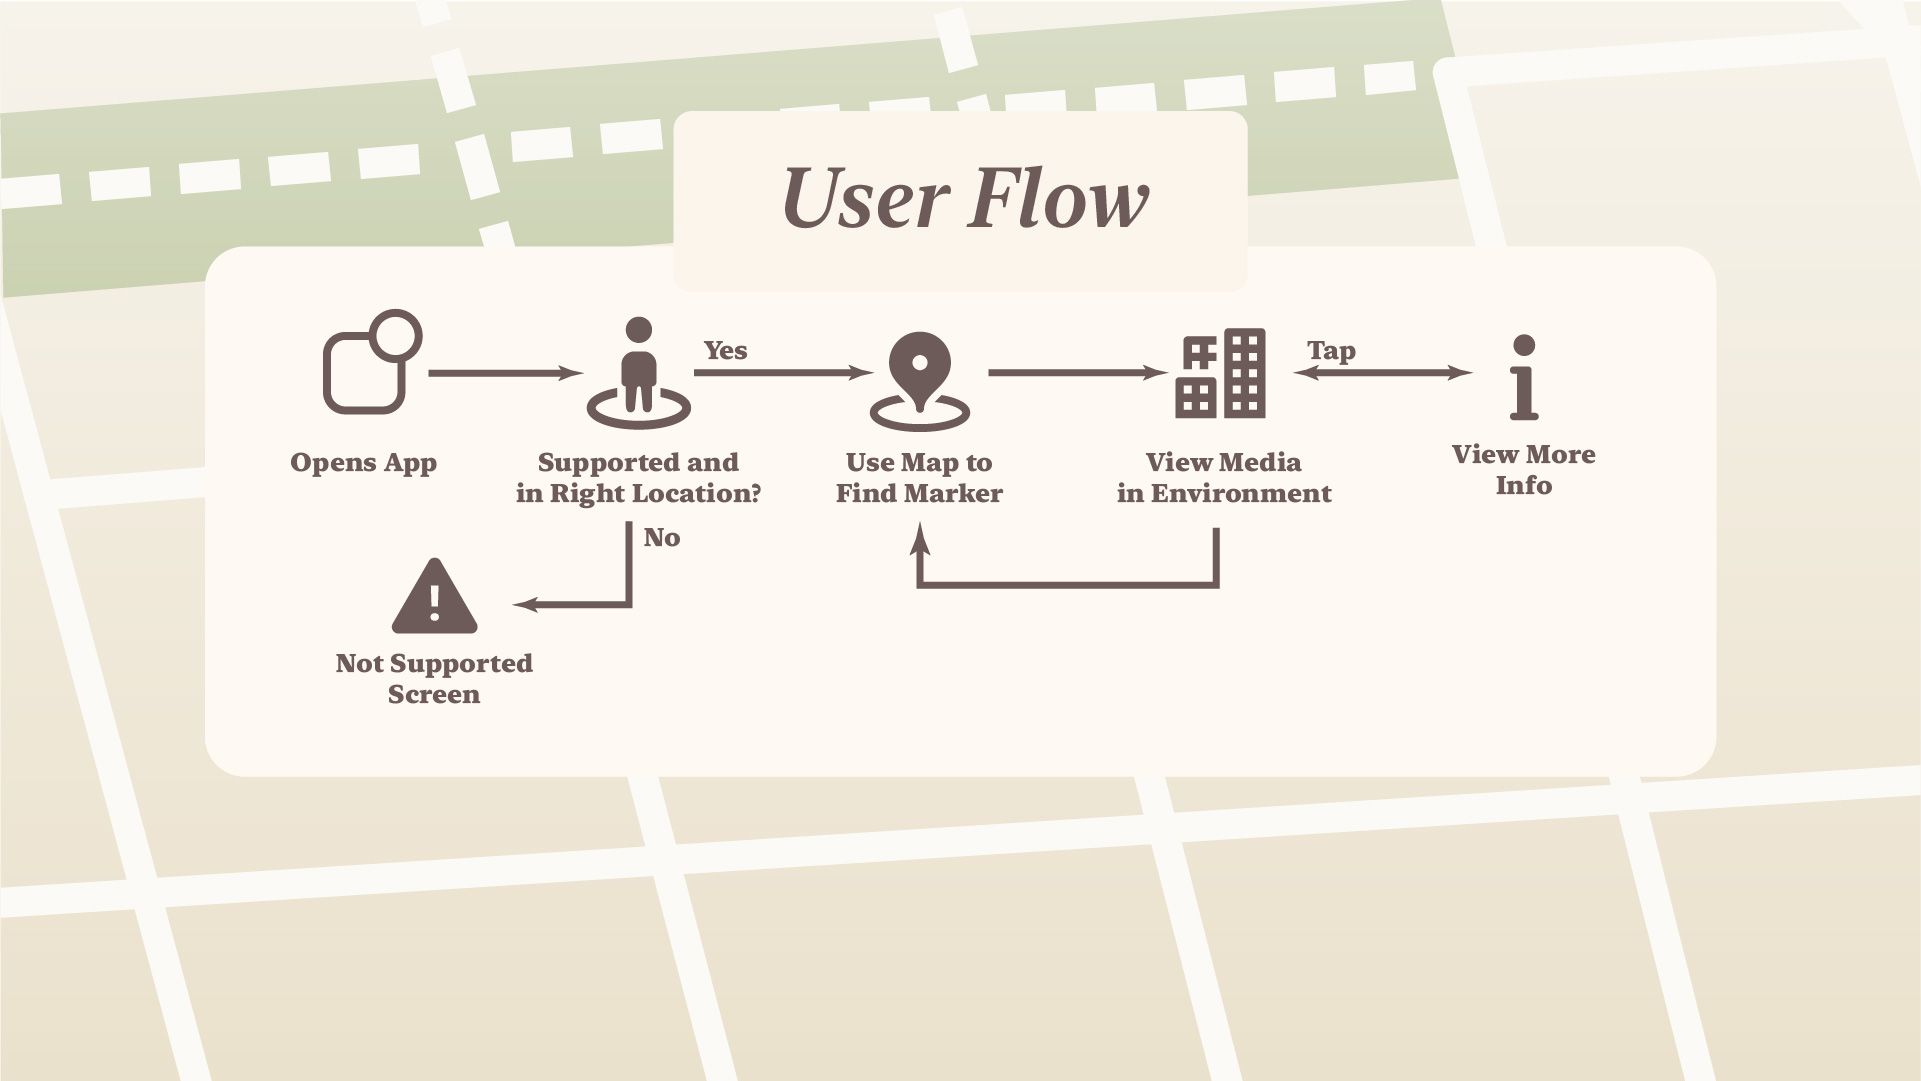
Next I thought through what the user flow would be throughout the app. As user flows go, this one is quite simple. First, a user starts off opening the app; if they're not in the right spot or if the ARGeoTracking API isn't supported on their device than it goes to a corresponding error screen directing them to go to the location or flashing a not supported error. Beyond that it gets into the central feedback loop of the app: using a map at the bottom to find markers in your area, then going to them to view them in the street. If the user wants more information, they can click on the marker and go to a info screen with specific details about it.
Lo-fi Wireframing
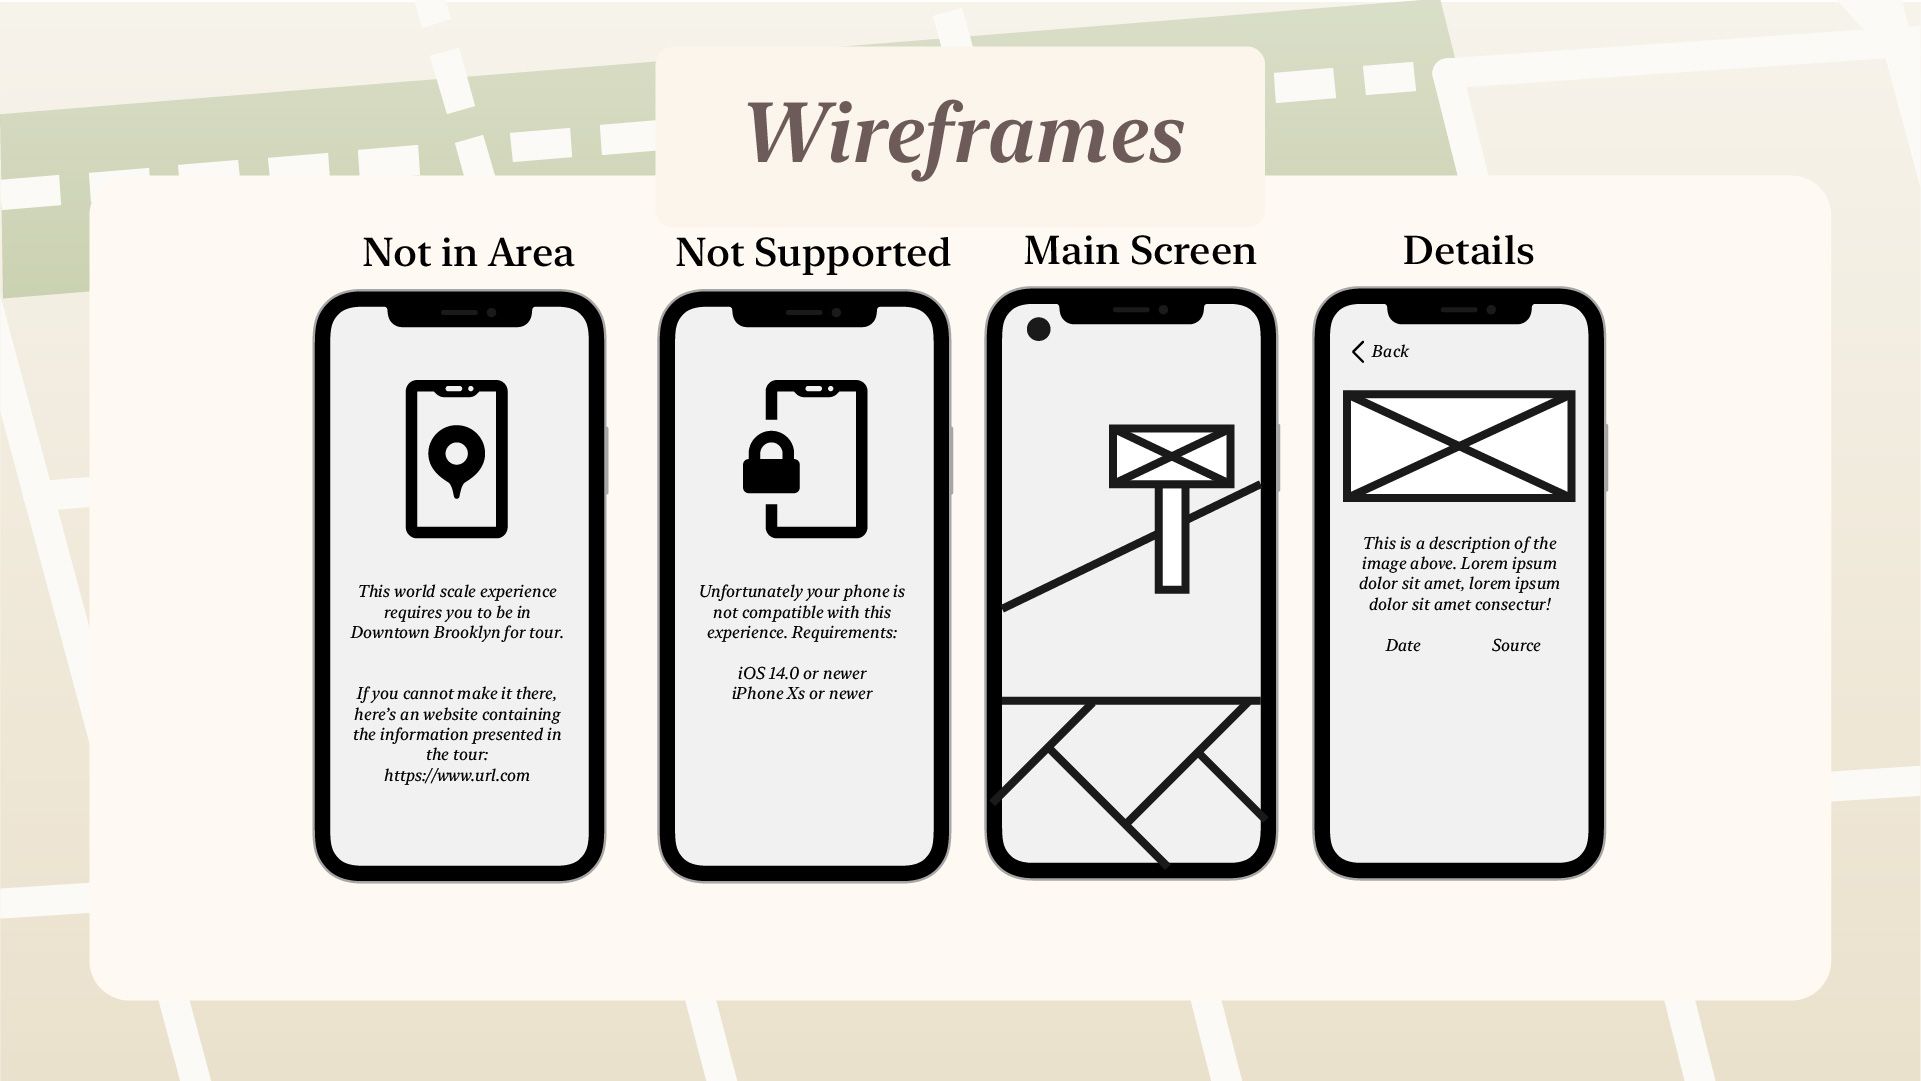
Now that I had a rough outline of the experience and the pages required to fulfill that experience, I set about wireframing the four major screens of the app:
3d Modeling
Finally, I 3D modeled the world-scale markers that would pop up inside augmented reality. This created a fun diversion away from the traditional UX process– I needed to try to consider what a 3-dimensional interface would look like and how it would integrate into the styling and functionality of the 2D interface. It was at this point that I decided that there should be three different types of markers within the experience– photos, audio, and information. After a bit of back and forth, I settled on a set of three markers in a fairly restrained style that was a middle ground between fully blending into the sidewalk environment and feeling unrealistic/out of place in the real world.

Programming
Background
With the iterative design process taking about two weeks of time to work through, I was left with two and a half weeks to fully develop this project as an iOS app before final presentation for the course. It was quite an ambitious timeline– I had just started learning Swift and iOS development this semester, and still considered myself a relative beginner. To enable this project to function as a world-scale AR experience, I'd have to use newly released (only about 1 month public, 6 month developer beta) ARKit features that haven't yet been used for any major projects I could find online.
GeoTracking API
Developing a project on newly released technologies is a double edged sword– while you might get the thrill of developing something new and increase novelty in the eyes of users, the documentation and collective body of information you're able to draw from while programming is severely lacking. There's virtually no third-party documentation for Apple's ARGeoTracking API, an API which requires a rather substantial departure from the way ARKit handles traditional anchors. Apple's first-party documentation is not great at directly explaining concepts, but lucky they did have an ARGeoTracking demo project that they put on their website. Coincidentally, it even has MapKit functionality built in that I was planning on developing myself.
My first task was to reverse-engineer their codebase for the example project to teach myself how the API functions. It took about half a week to throughly map out what methods connected where to do which tasks, but once that was done I had a working knowledge of how the new API functioned. The final codebase ended up being a hybrid of existing code from the ARGeoTracking Demo to handle state changes in the tracking lifecycle and my code which handles the actual marker placement, error screens, detail screens, and more.
Ray Casting
As an example of what some this code looks like, here's the chain of methods/files that handles tapping on photo markers to get the detail view overlay.
Setting up the ability to handles tapping on AR View:
        // Add tap gesture recognizers
        arView.addGestureRecognizer(UITapGestureRecognizer(target: self, action: #selector(handleTapOnARView(_:))))
Actual method called when user taps:
// Responds to a user tap on the AR View.
    @objc
    func handleTapOnARView(_ sender: UITapGestureRecognizer) {
        // Detect tap on entity
        // Modified from https://stackoverflow.com/questions/56736645/hittest-prints-ar-entity-name-even-when-i-am-not-tapping-on-it
        let tapLocation: CGPoint = sender.location(in: arView)
        let result: [CollisionCastHit] = arView.hitTest(tapLocation)
        guard let hitTest: CollisionCastHit = result.first
        else { return }

        // Assign first entity hit to variable
        let entity: Entity = hitTest.entity
        // Get data about entity
        let geoAnchorIndex = markers.firstIndex(where: { (Marker) -> Bool in Marker.name == entity.name})!
        let geoAnchorType = markers[geoAnchorIndex].type
        // If of type photo
        if(geoAnchorType == "photo"){
            // Open photo view controller
            if let photoDetailVC = storyboard?.instantiateViewController(withIdentifier: "PhotoDetailViewController") as? PhotoDetailViewController {
                photoDetailVC.name = entity.name
                navigationController?.pushViewController(photoDetailVC, animated: true)
                self.present(photoDetailVC, animated: true)
            }
        }
        ...
   }
Which then passes to the PhotoDetailViewController:
class PhotoDetailViewController: UIViewController {
    @IBOutlet weak var imageView: UIImageView!
    @IBOutlet weak var dateLabel: UILabel!
    @IBOutlet var descriptionText: UITextView!
    @IBOutlet var sourceLabel: UILabel!
    @IBOutlet var dateSubLabel: UILabel!
    @IBOutlet var sourceSubLabel: UILabel!

    var name: String?

    override func viewDidLoad() {
        super.viewDidLoad()
        // Get picture info from array with name
        let pictureIndex = descriptions.firstIndex(where: { (description) -> Bool in description.name == name})!
        let pictureDate = descriptions[pictureIndex].date
        let pictureDescription = descriptions[pictureIndex].description
        let pictureSource = descriptions[pictureIndex].source

        if name != nil {
            imageView.image = UIImage(named: name!)
            dateLabel.text = pictureDate
            dateLabel.font = newYorkFont
            sourceLabel.text = pictureSource
            sourceLabel.font = newYorkFont
            descriptionText.text = pictureDescription
            descriptionText.font = newYorkFontSmall
            dateSubLabel.font = newYorkFontSmall
            sourceSubLabel.font =  newYorkFontSmall
        }
    }
}
User Feedback
Winter Show
I was provided an excellent opportunity to demo this project for the hundreds/thousands of visitors at the ITP/IMA 2020 Winter Show. I got quite a lot of useful feedback, even as the coronavirus and a winter snowstorm prevented me from having an interactive or live demo. Here's a video of my interview during the show (it took place in a web-based 3D world due to the pandemic):
One of the major suggestions was to add some sort of ability to track personal progression with some sort of user-awarded digital good– be it a stamp in a stampbook or a 3D item or a picture scrapbook. I quite like this idea as I always felt that the experience, cool as it was, wouldn't feel all that rewarding to someone that wasn't a massive history buff. Another suggestion was to improve the navigation features for tourists, who might need a more visual reminder to feel comfortable with getting around the neighborhood (within the AR View itself rather than markers on the map).
Next Steps
Original
The original plan was to use the next few months while tourism is still at a trough (due to winter cold and pandemic) to develop a few of the features suggested by visitors to the show and then release the tour.
Update 2022
I ended up making this into my Capstone.